Troubleshooting Adapter and Monitor FaultsIn this video, I will look at troubleshooting adapter and monitor hardware faults. In some cases, you will be able to fix the problem, but in others you will need to replace the item in order to fix the problem.
Persistence Image
The first problem that I will look at is persistent image. When this happens, the previous image on the screen will leave a shadow or an impression on the screen. When this occurs, turn the display off for a little while. This will allow all the pixels to power down and hopefully reset back to off. On some monitors, there may be a reset function which will attempt to reset all the pixels back to their defaults. Generally, when this function is activated, the monitor will need to be left off for a few hours to complete the process.
In some cases, you may not have an old image that is visible, but you may have some pixels that are causing problems.
Stuck Pixels
Next, I will look at stuck pixels. A stuck pixel is when a pixel or a sub-pixel is stuck either in the on or off position. In some cases, it may only be a sub-pixel, that is only the green, red or blue component. In other cases the whole pixel may be affected.
Since it is limited to a sub-pixel or pixel it may not be that noticeable. In the worst case, you may have a black screen and a single lit up pixel or a white screen with a noticeable black pixel. If you start getting more stuck pixels, it will start to become more noticeable.
To see if you have any stuck pixels I will run a quick test video.
This test video will display red, green, blue, white and black. The whole screen will be the same color. If you have any pixels that are not working correctly, you should see a dot or dots on the screen that are not the same as the others. Hopefully, you won’t have too many of them.
In some cases, the pixel may just need to be worked a little to free it up. There are plenty of stuck pixel videos available which will flash colors on the screen. There is also software that does the same thing. They essentially change the color on the screen very quickly, which gives the pixel a little work out. Hopefully, that will free it up.
If you do some searching, there are some other methods that may free the pixel up. For example, gently tapping on the affected area of the screen with a stylus or pencil eraser to free up the pixel. We can’t recommend any of these approaches to you, as if you try them there is a risk of damaging the screen further. In some cases, the pixel may not be fixable.
Defective Pixels
In some cases, it does not matter what you do, the pixel won’t work correctly and is considered to be defective. This occurs because the screen itself is damaged. You can see in this example the thin wires that powered the cell are damaged. It does not matter what sort of tricks you do; you won’t be able to fix this.
If the pixel is permanently black, it is called a dead pixel. A pixel that is always white or a particular color is a lit pixel. In this example, a broken wire like this in a TN monitor will cause a black pixel. In an IPS or MVA monitor, a broken wire will result in a lit pixel. The problem may not always be a broken wire, a faulty transistor can cause the switch to be always open creating the opposite effect. Since the color on LED screens is divided into red, green or blue, if only a single cell is broken, this won’t appear as white or black but another color.
Different manufacturers have different policies on defective pixels in manufacturing and replacement of LCD screens. Some manufacturers will sell LCD screens with a guarantee that the screen will not exceed a certain number of defective pixels. Others will sell the screen and not check how many defective pixels there are. However, if you attempt to have the LCD screen replaced, they will count the number of defective pixels and not replace it unless there are a certain number. For this reason, check the manufacturer’s policy before buying or attempting to get a replacement.
Burn-in/Ghosting
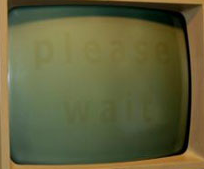
The next problem you may come across is burn-in or ghosting. This is when you can see discoloration on areas of the screen. This can potentially even be seen when the monitor is off. For example, in this case you can see that “please wait” can be seen even when the monitor is off. Screen burn occurs when the same image is displayed on the screen for long periods of time.
CRT monitors suffered from burn-in due to the phosphor components losing their luminance as time goes on. Some plasma screens are also vulnerable to screen burn. You can see in this example a plasma screen used in an airport. You can see the burn-in green and yellow colors on the screen. Also, there is some burn-in for the title at the top of the screen. As technology improved, screens became more resistant to burn-in, so you will find this will be more of a problem with older plasma screens.
To get around this, operating systems use screen savers to change the pattern on the screen, so the same image is not being displayed all the time. The good news is that modern LCD screens are very resistant to burn-in. This does not mean that it cannot occur; however, it is less likely to do so. More of a concern is the new technology OLED. OLED uses LEDs to produce an image, and as time goes by, these LEDs reduce in brightness. If you display the same image all the time, that area of the screen’s LEDs will reduce in brightness at a different rate to the other LEDs on the screen.
In this example, you can see that this OLED monitor was playing CNN all day. Because of this, the CNN logo and lower third graphics are on the screen all day. This has caused burn-in to the screen as it has been displaying the CNN logo for a long period of time. OLED LEDs will wear out the longer the screen is in use. This is because the LEDs displaying that image wear out at a different rate to the rest of the LEDs on the screen. I will next look at how you can reduce the effect of burn-in on your screen.
Reduce Burn-in
Although improvements in technology have made screens more resistant to screen burn-in, the new OLED screens are still subject to screen burn-in. OLED screens costs a lot of money, so you want to prevent this if possible. Let’s consider that you have video playing on a screen and there is a logo at the bottom.
If the logo is always in the same spot on the screen, what you can do is change the zoom and position of the image, so the logo is no longer visible. By doing this you also crop some of the image. In some cases, this may be an acceptable trade off, at other times it will not. If the logo is very big, you may just want to move the screen around a bit periodically to help even out the burn-in.
On newer monitors, there may be a feature which will automatically detect logos and reduce the brightness of them. This will be configured in the monitor menu. When enabled, the monitor, over time, detects the presents of the logo and will reduce its brightness. It does not reduce it too much, but even a little will have an effect on screen burn-in.
Logo detection is a new feature and is not available for every screen, but another feature that has been available in a lot of monitors since plasmas came out is screen shift. When enabled in a monitor’s menu, the monitor will periodical shift the image. The shift is only slight, and you should not notice it when it occurs. The idea behind this is, that by shifting the image slightly, this will help reduce burn-in for static items like logos.
In some cases you may be getting unwanted images or discoloration due to other reasons.
Artifacts
If you find that you have random graphics or other color discoloration on the screen, this may be because of artifacts. An artifact is essentially unwanted alteration to an image during processing. Artifacts can occur in many different forms. When converting images from one format to another, the process can introduce artifacts which will look like a small amount of distorted graphics that were not in the original image.
The same can appear on monitors or as distortions in the colors. When this occurs, you need to check the cabling or replace the cabling or graphics adapter. On old graphics standards, like VGA and DVI, if there was a pin not connecting correctly this could potentially result in losing or dimming a color on the screen, for example, losing all the red color. Modern video standards use digital signals so it is less likely you will lose a color. With digital however, if you have signal problems, maybe by using a cable that is of low quality and too long, problems with the image may occur. For example, getting artifacts or seeing part of the image flickering.
Before you replace the graphics adapter, it is always a good idea to upgrade the device driver to the latest version. Sometimes strange graphics problems can be fixed by simply updating the graphics device driver.
LCD Flicker
In some cases, the image may be fine; however, you are getting flicker on the monitor. This generally will be a problem with the LCD backlight and it needs replacing. Since modern monitors use LED lights they should not flicker, and if they are flickering, there is a problem.
Remember that in disassembling a monitor there is a risk of electrocution, so it is best to take it to a service center. In some cases, you may have problems with the image, but this will be because of a damaged screen.
Damaged Screen
When you have a damaged screen, the solution is pretty simple, it needs to be replaced. It is pretty easy to tell when the screen is damaged. If you recall our previous video on how monitors work, essentially the pixels are controlled by a grid of wires in the screen. When this grid is damaged, often a large number of rows below where the damage has occurred will also be affected. You can see in this example that as you go down the screen some of the image can be seen.
LCD screens contain crystal liquid. When pressure is placed on the screen or the screen suffers impact damage, this can damage the structure holding the liquid crystal, causing the liquid crystal to run through the other structures. This is why you will often see strange shapes inside the LCD screen that look like a liquid has run through it.
To replace the screen, you can take it to a repairer to replace the screen for you or you can attempt to replace the screen yourself. If you attempt to replace the screen yourself, be careful as there are a number of components inside the LCD screen that can electrocute you. Pretty much no monitor manufacturer makes schematics of their monitors available to the public; the liability of doing this is too great. In other words, the chance of you electrocuting yourself trying to fix it is too great. Parts like inverters can hold power for several minutes after the power has been switched off. There are plenty of places that will repair an LCD monitor for you.
If you do decide to give it a go, there are number of companies that provide LCD screens and also a number of sites like Ebay where you can get a replacement screen. They can, however, be very tricky to replace.
Unexpected Reboots
The next problem you may come across is unexpected reboots. These generally fall into two categories: These are blue screen errors and system reboots. Most blue screen error messages, or otherwise known as blue screen of death, occur because of faulty display adapters. When you experience one of these, it is a good idea to upgrade your device driver. Not all blue screen error messages will be because of the video adapter; however, when you experience this error, have a look at the error code and other information and see if it has anything to do with the video adapter.
If the blue screen occurs when you attempt to do certain things, it is probably software related. Check your software does not need to be updated. Also, software like operating system updates should be installed. A lot of software is also updated when you update a device driver, for example graphics APIs, so you should also update the device driver.
The other problem that you may experience is unexpected reboots. These occur when, completely unexpectedly, the screen goes black and the computer restarts. These are often difficult to troubleshoot, because unlike blue screen errors, you don’t get given any troubleshooting information. There are a number of things that you can check to see if it is video card related.
Firstly, you can check if there is any damage to the video card. Sometimes you will find that the capacitors on the video card are damaged. Most capacitors are cylindrical in shape. The capacitor should have a flat top. If the top is raised, the capacitor is damaged. Sometimes the capacitor top will be cracked. Capacitors regulate power to the video card. When they are damaged, they can no longer do this effectively and this can cause unexpected reboots. For the CompTIA exam, they refer to damaged capacitors as distended capacitors.
Over time, a damaged capacitor will become less and less effective. This will result in more unexpected reboots and eventually the video card will stop working. In this case, you can replace the video card or the capacitors. To replace the capacitors requires the old capacitors to be removed and new capacitors to be soldered onto the board to replace them. It takes a bit of skill to do this, so it is generally easier just to replace the video card.
The next cause of unexpected reboots is overheating. The GPU and memory can potentially get quite hot. Maximum temperatures for video cards vary. As a general rule, if the video card is going above 90 degrees Celsius or 190 degrees Fahrenheit, it is starting to get too hot. If you want to check how hot your GPU is, there are a number of free tools available. One good tool is GPU-Z.
The GPU heat will increase depending on the workload. If you find the GPU is idle and the temperature is quite high, the GPU is probably not getting cooled effectively. This could be because a fan has stopped spinning. It could also be because the heat sync on the fan is not being effective. Generally speaking, once the heat sync is connected during manufacturing it should stay on and be well connected to the GPU. However, if for some reason it comes loose, it won’t be able to properly keep the GPU cool.
If there are problems cooling other devices in the computer, this can affect everything in the computer. I once opened a computer and it felt like an oven inside. What had happened was, the CPU fan was not connected, causing the inside to heat up. When this occurs, hot air can go into other components causing problems. If the power supply gets too hot, this will cause the computer to switch off. The computer most likely won’t start up again for a minute or two if this occurs. This is because, essentially, the resettable fuse in the power supply has been tripped and takes some time to reset itself. The power supply won’t work until the fuse has reset.
The next problem you may come across is power supply problems. If the power supply is not able to supply enough power to the video card, this can cause an unexpected reboot. This is something to consider if you are adding a second video card or upgrading an existing video card – check if the existing power supply is able to supply enough power.
Copy Protection
The next problem you may have with graphics adapters is copy protection. Copy protection is available on DVI, HDMI, DisplayPort and Thunderbolt. The copy protection works by requiring the device used to be authenticated. The idea behind this is to prevent a device that is not authorized from connecting and potentially copying the video signal.
If you are having problems with copy protection, you can simply disable it. Copy protection, since it was first implemented, has had a lot of problems. Because of all these problems, it was not practical to require copy protection to be mandatory, because the problems would cause even compliant devices to not work. Nowadays a lot of the problems have been fixed; but still, in a lot of cases, you should be able to disable it without any problems.
If you require copy protection, remove any additional devices that are not compliant, for example, devices like video capturers and splitters. These devices are often required for live streaming. Many devices like sound bars or other sound devices do not support copy protection. When this occurs, you will need to disable the copy protection in order to use these devices.
Clean Monitors
If you have tried everything and the image still does not look right, maybe the monitor is just dirty. To clean it, use antistatic monitor wipes or a microfiber cloth. Don’t use liquid cleaners as these may contain chemicals like ammonia. With some cleaners the chemicals will damage the LCD screen plastic or other components. The liquid could also potentially get into the monitor and cause a short.
End Screen
Well that covers it for troubleshooting some of the adapter and monitor hardware faults you may come across. If you find this video helps you fix your monitor, feel free to leave a comment in the comments section and let us know. Until the next video from us, I would like to thank you for watching.
References
“The Official CompTIA A+ Core Study Guide (Exam 220-1001)” Chapter 5 Paragraph 176 – 179
“CompTIA A+ Certification exam guide. Tenth edition” Pages 789 – 790
“Defective pixel” https://en.wikipedia.org/wiki/Defective_pixel
“Picture: Mouse pixels” https://unsplash.com/photos/deb2EnbWPr8
“Picture: Screen burn in” https://upload.wikimedia.org/wikipedia/commons/4/45/Screen_burn_screen_off.png
“Picture: Airport screen” https://commons.wikimedia.org/wiki/File:Plasma_burn-in_at_DFW_airport.jpg
“Video: Woman drinking coffee” https://pixabay.com/videos/coffee-woman-girl-beverage-drink-20564/
“Picture: Cat kitten” https://pixabay.com/photos/kitty-cat-kitten-pet-animal-cute-551554/
“Picture: cat in moon light” https://pixabay.com/photos/tree-cat-silhouette-moon-full-moon-736877/
“Video: cat games” https://pixabay.com/videos/game-cats-pet-34993/
“Picture: Damaged video capacitors” http://rodrigo.sharpcube.com/
“Video: Cat in snow” https://pixabay.com/videos/mountains-snow-alpine-child-play-15336/
Credits
Trainer: Austin Mason http://ITFreeTraining.com
Voice Talent: HP Lewis http://hplewis.com
Quality Assurance: Brett Batson http://www.pbb-proofreading.uk

