Digital CamerasIn this video from ITFreeTraining I will be looking at Digital Cameras. Digital Cameras have become so common that they are being integrated into so many new gadgets on the market. This video will look at physical digital cameras, however, it will also give you an idea of what to look for in an integrated camera such as the one found in a mobile device.
Camera Sensor
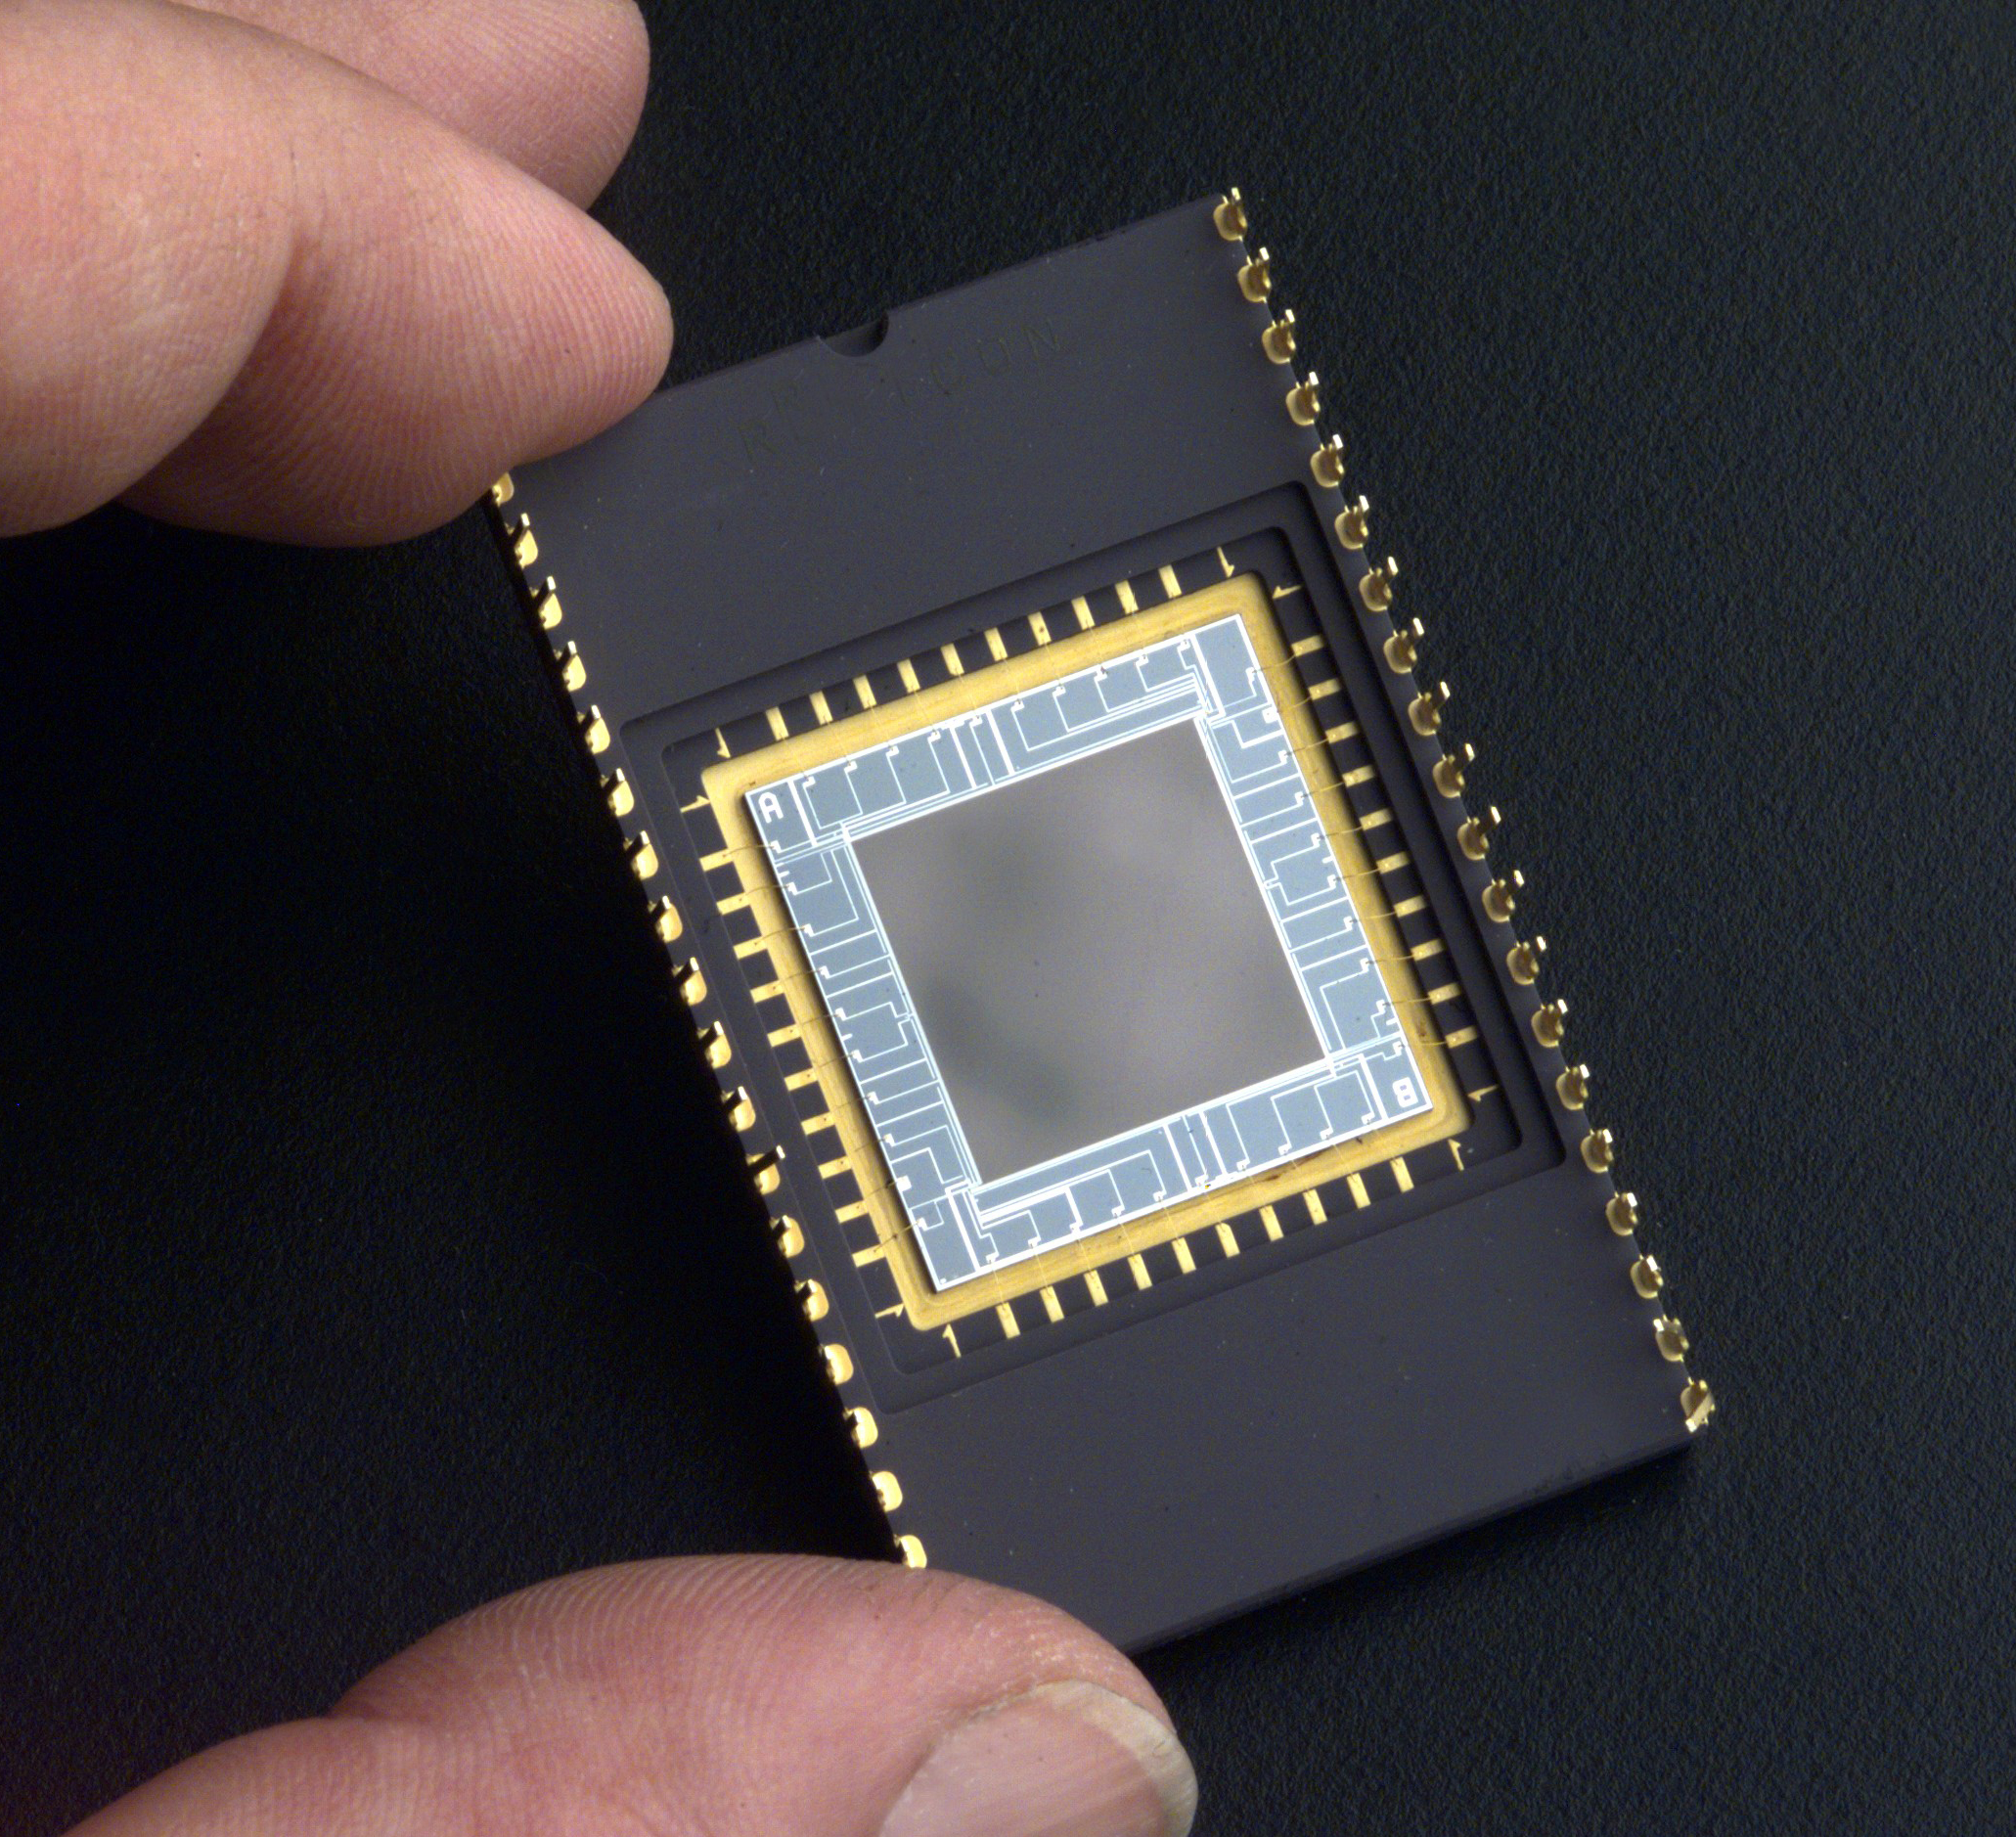
To understand what to look for in a digital camera, the first thing that I will look at is the camera sensor. The camera sensor is what converts light into digital data. The sensor itself, is a chip that is installed in the camera.
The sensor itself is divided up into an array of essentially tiny capacitors. When the light hits these capacitors, energy is collected. The amount of energy collected over a period of time is measured. This essentially is the first step of converting light into digital data, collecting it and measuring it.
To understand this better, consider that you have a measuring cup. If it starts raining, the measuring cup starts filling up with water. At periodic intervals we measure how much water is in the measuring cup and tip out the contents. The process then repeats again.
The same is true for our camera sensor. The tiny capacitors fill up with energy. The amount of energy will depend on how much light hits the sensor. At periodic times, the amount of energy is measured and this is converted into digital data.
You can start to understand how important the sensor is. A good quality sensor will be able to give better readings and thus produce better results. Let’s have a look at the two main sensors commonly sold on the market.
CCD vs CMOS
The two common camera sensors on the market are CCD and CMOS. The way the sensors work internally is different. Thus, by looking at the two side by side you won’t be able to tell the difference between them.
CCD works by having light charge tiny capacitors on the sensor. By contrast, CMOS works by what is called a field-effect transistor. Essentially energy is captured in an insulated cell which can be later drained to work out how much energy was captured.
CCD sensors were the first sensors to be developed and have been in use since the 80’s. CMOS sensors were developed in the 90’s. In 2007, CMOS sensors sales surpassed CCD sensors. CCD sensors require more power to operate than CMOS sensors. With the introduction of cameras in devices like mobile phones and tablets, you can understand why CMOS sensors have become popular due to them requiring less power to operate.
CCD sensors have lower noise and greater sensitivity than CMOS sensors, thus giving better results. However, CMOS sensors’ noise and sensitivity are getting better, so much so that they are close to CCD sensors nowadays. CMOS sensors are the dominant sensor in the market. With the performance being so close to that of CCD and the fact that they use less power, you can see why. They also currently cost less to manufacture. Later in the video I will look at why personally I am less worried about the kind of sensor the camera uses and more about other factors like the resolution of the sensor. Before that, I will have a look at an effect you can have on a CMOS sensor called the rolling shutter effect. This is a problem that you may experience on many CMOS sensors, however, generally this does not occur on CCD sensors.
Rolling Shutter
CMOS in contrast to CCD sensors generally capture the image by scanning from top to bottom while the camera sensor is still exposed to light. This is called rolling shutter as opposed to global shutter, which I will talk about in a moment.
Rolling shutter is generally experienced with CMOS sensors. The problem with having the sensor exposed while capturing is that if there is fast movement while the image is being captured, this can cause a distortion effect.
This can generally happen in two different ways. The first way is when the camera is moving while the image is being captured. In this example the image is being capture from a car while it is moving. You will notice that the image appears to be tilted. While the sensor was being read from top to bottom, the car moved, meaning the image that the camera was capturing had shifted. This causes the tilting effect shown.
The next effect you may see is when the camera is still but there is a fast movement from something in the image. In this example, you can see the helicopter blades appear to be bent towards the back. In reality we know the blades are straight, however, since they are moving so quickly while the sensor is being read the blades appear to have moved.
CCD sensors are generally designed differently from CMOS sensors, so do not generally have the problems of rolling shutter. CCD sensors can get around this problem by using what is called global shutter. Global shutter reads the whole image at once rather than line by line. If you have a CCD camera it will most likely use global shutter; if you have a CMOS camera it may support global shutter.
If your camera is affected by rolling shutter, you are most likely going to experience it with
fast-moving vehicles moving across the frame or fast-spinning objects. Knowing your camera’s limits, you may be able to work around them. You may also be able to change some settings on the camera to reduce the effect.
With the advancement in CMOS sensors and them being more common in the marketplace, there is a good chance that your camera will have one. Given how close in performance they are to CCD, I would personally not be too worried about purchasing a camera with a CMOS sensor. Just be aware of the rolling shutter problem, however, as the technology gets better it will become less of a problem.
I will next have a look at another important consideration to look at when purchasing a camera and that is the resolution of the sensor.
Megapixels
Before this, I will look at sensor resolution and I will first have a look at Megapixels. They are used to measure the size of pictures. Essentially, one Megapixel is one million pixels. The more Megapixels the bigger the file for the image will be.
Shown here is a chart of Megapixels and file size. When purchasing a camera, you will often see the Megapixels of the camera in the specifications. Looking at the Megapixels will give you an idea of how large the files will be. Due to compression, the files will be smaller, but Megapixels will give you an idea. However, Megapixels was previously used as a marketing term and may not give you a true indication of the quality of the camera will be, so let’s have a look at why.
Sensor Resolution
When looking at the quality of a camera, one of the things to consider is sensor resolution. In the old days of digital cameras, it was commonplace to give the specification in Megapixels. However, the manufacturer would often use a smaller resolution sensor and upscale the image to a higher resolution. Thus, it was misleading to look at the Megapixel specifications.
Nowadays, the specifications are generally listed as effective pixels or resolution. This is a measure of the number of usable pixels. That is, a direct relationship to how many pixels the sensor can capture and output and not using techniques like upscaling to make it appear the camera can capture an image with a higher resolution than it actually can.
You may also see actual pixels listed in the specifications. The sensor itself will include a number of pixels that are not usable. For example, they are on the edge of the sensor and don’t get any light. This figure will be higher than effective pixels but does not give a true representation of how many pixels the sensor will capture. If you see the actual pixel specification, keep in mind that effective pixels is generally a little lower.
Sensor resolution is not the only thing to consider. The size of the sensor also needs to be considered. In this example you can see two sensors with the same effective pixel count, however, one is much larger. Larger sensors mean less noise and better quality. A larger sensor means more surface area for light. More surface area means you can get a better measure of the light and is less likely to be affected by noise.
Larger sensors cost more money to make. You can understand then why a more expensive camera may have the same effective pixels as a cheaper camera, however, it will produce better results due to the sensor in the camera being much larger. There are now cameras on the market where the sensor is the same size as 35mm film. You can understand that if a sensor is large, this will give a much better result. The sensors that you find in mobile devices are generally very small, so you can understand why they don’t give as good a result as the larger sensors. You can start to appreciate why sensor size has started to become more important to look at then the resolution. A lower resolution but big sensor can potentially give better results than a smaller sensor of higher resolution. This is basically because the larger sensor is better at capturing the image with less noise.
Now that we have an understanding of how a camera works, let’s now have a look at some of the different types of cameras that you can purchase.
(Digital Single-Lens Reflex) DSLR
To start with, I will look at the professional range of cameras. Having a look at the technology used in these cameras will give you a better understanding of what features they have and what features will be missing in the cheaper cameras.
When looking at a professional camera, in a lot of cases you will be looking at a DSLR. This stands for Digital Single-Lens Reflex. It is not clear from the name how it works, however, this will make sense shortly. This system uses a mirror and prism system to see and capture an image.
To understand how this works, I will have a look at the parts inside the camera that make it work. To start with, you have a lens which focuses the light coming through the camera. In the case of DSLR cameras, in a lot of cases the lens will be changeable so you will be able to buy additional lenses and change them as required. Good lenses cost a lot of money. You can easily spend thousands of dollars on a good lens. If you want a good telescopic lens this can cost even more. A very good lens often costs more than the camera.
In order to capture the light from the lens, there is a sensor at the back of the camera. In the case of a DSLR camera this sensor will be digital. DSLR is designed the same way as SLR cameras were. SLR cameras were the predecessor to DSLR. The design is essentially the same, however they didn’t use a digital sensor. You can start to understand where the name comes from. Digital because the sensor is digital and single lens as there is a single lens used in the camera.
The next part of the camera is a mirror. The mirror reflects the light coming from the lens away from the sensor. This will make more sense in a moment. The light is reflected to a prism. The prism’s job is to bend the light so it can be seen through the viewfinder. Essentially what we have here is a system that allows you to see through the lens finder exactly what is being seen by the lens.
The last part of the design is a moveable mirror. You can see with this DSLR camera, when I press the button to take a photo the mirror moves out of the way to expose the digital sensor.
You will also hear the sound of the mirror being moved. When you hear this distinctive sound, you know you are using a DSLR camera. A camera designed with a moveable mirror like this is where the name reflex comes from.
When you take a photo, because the mirror moves for a split second, you won’t be able to see anything through the viewfinder. The viewfinder will essentially appear to be black for a split second.
In the case of this DSLR camera, it can also capture video. You will notice that when I switch the camera into video mode, the mirror moves but stays in the upward position. This is because to capture video the light must be constantly hitting the sensor. This essentially means the mirror must be in the upward position. This also means that you won’t be able to see anything through the
viewfinder.
To solve this problem, the DSLR camera has an LCD screen on the back. This will show you what the sensor in the camera is capturing. So far, the only advantage of this design is that we can see what the viewfinder sees. However, when capturing videos this is not possible and the LCD screen needs to be used. The next question you may be asking is, why go to all this complex design using a mirror? Why not just use an LCD screen to show what the camera sees? To understand this, let’s look at the next feature DSLR cameras offer over other cameras.
Auto Focusing
One of the big features that DSLR cameras have is fast auto-focusing. I won’t go into the technical details here, but essentially using the mirror allows for dedicated focusing sensors to be used which allow for very fast focusing. By contrast, using the sensor to auto-focus is much slower. Let’s have a closer look.
I have a DSLR camera set up that is currently out of focus. You will notice that if I look through the viewfinder, I can see it is out of focus. Notice that when I press the photo button, how quickly the camera was able to focus. It was able to focus in a split second. So, using the mirror we have fast focusing, however, the downside is that the LCD preview is not available since the camera needed the mirror for focusing.
To understand the difference this focusing method has, I will now look at the same camera action, however, this time I will switch the camera into video mode. Once in this mode, the mirror is moved into the upward position so the sensor can constantly record. Since the sensor is always recording, the LCD preview can now be displayed on the LCD screen.
On this lens there is a distance indicator. Essentially this will indicate how far away from the camera the lens is trying to focus on. You will notice that when I press the button to focus, the lens will go from one extreme to the other extreme moving back to the best focusing point. It is a kind of a hunting like behavior, trying to find the best focus. Essentially what is occurring is that the sensor is gathering data from all the focusing positions and comparing them together. Once it has all the data it can work out which is the best focusing position, basically going in and out of focus in both directions and working out where in the middle it needs to focus.
You noticed how long this process took compared with using the mirror which was almost instantaneous. Consider that you are taking photos of a fast-moving scene, for example, a sports game. You can understand why the professionals use such an expensive camera to take photos. You want a camera that can focus on a fast-moving subject very quickly. In sports, these moments happen very quickly, and you don’t want to wait for the camera to focus or you will miss the moment.
Mirrorless Cameras
The next camera that I will look at is a mirrorless camera. Since this camera does not have a mirror in it, it does not have a viewfinder. Since it does not have a mirror, it does not require the extra components and thus can be made smaller. In this example, the camera is quite large, but you can get mirrorless cameras that are a lot smaller. Since they don’t require all the additional components for a mirror system, they are cheaper to manufacture.
These cameras will have slower auto focus than a mirrored camera. The technology however has improved so the speed they can focus at using a sensor has improved. For example, a lot of the hunting behavior moving the lens back and forth trying to work out the focus has been eliminated. However, it is still not quite as fast as a DSLR camera, so I would not purchase one of these if you are trying to capture fast-moving sporting events. However, photo wise, you can get some good results. At the end of the day, your results will largely depend on the sensor the camera has.
In the case of mirrorless cameras, they may have a changeable lens. The more expensive cameras will, however, the cheaper ones will have a fixed lens that can’t be changed. You can start to see that if you don’t need features like fast auto focusing, a good mirrorless camera with a good sensor may be worth looking into. At the end of the day, it all depends on your budget.
Basic Camera
If your budget is very low, you may want to consider a very basic camera. The advantage of these is they’re cheap. Keep in mind that even if the camera records at the same resolution as one of the more expensive cameras, it more than likely has a smaller sensor. This means lower quality.
The technology used in these cameras has come a long way, so nowadays, if you are taking photos and there is plenty of light, even a basic camera will give you pretty good results. With cameras like these, you won’t be able to change the lens. You are essentially stuck with the same lens. Good lenses cost a lot of money. A good sensor will get you a long way in terms of quality, however, to get even further you are going to need a good lens. Nowadays, even the quality of these basic cameras is quite good, so unless you are doing some professional work or something needing a telescopic or zoom lens you won’t need to change the lens.
The other advantage of cameras like these is they are simple to use. Most of them will have some options you can configure, however, other than this they are essentially point and shoot.
Nowadays, a lot of mobile devices will have an integrated camera. So, your cheapest options will be to use this since you probably already own one. Let’s have a look at how these perform.
Mobile Devices
Many mobile devices and devices like tablets have integrated cameras. These devices are designed to be small, even the larger tablets are designed to be thin. This essentially means the camera sensor is quite small. These sensors are generally around one-third to half an inch in size. To give you an idea of the size difference, a professional DSLR camera may have a sensor 1.4 inches in size. The larger sensor allows for better quality images to be taken.
This does not mean that you can’t get some good results. Integrated cameras like these work best with good lighting but are not so good if there is fast movement. If you take a picture at night with a mobile device and compare it with a DSLR camera, you will see a big difference.
The reason for this is the smaller sensor limits how much light it can capture. One of the tricks to get around this is to increase the exposure time. That is, the time the sensor is exposed to light. However, doing this means that if something is moving quickly in front of the lens it is more likely to get motion blur reducing how well you can see it.
Given the limited width of the device, there will not be room for extra features like optical zoom. Optical zoom allows the lens to be adjusted, which changes how close or far away an object you are taking the photo of will appear. Optical zoom is generally supported in mobile devices nowadays but is limited in the results it can achieve.
To get around this, many devices will have digital zoom. Digital zoom is when you focus in on part of the image and crop the image around it. Consider that you have a physical photo. Digital zoom would be the equivalent of enlarging the image on a photocopier. The image looks bigger, however, all you are doing is looking at a particular part of the image. The more you use digital zoom, the lower quality your image will be. If you find that the quality is too low with digital zoom, consider moving closer to the object rather than using digital zoom.
You may be thinking, could we solve a lot of these problems by using a bigger sensor. The answer to this is that a bigger sensor means more heat and more power. The heat is more of a concern since mobile devices don’t have cooling components like fans. Because of this, the manufacturer has to be careful about how much heat they generate. The devices are also designed so components are spread apart so the heat does not affect each other. Making the sensor bigger makes this harder to do. The extra size of the sensor will also mean more power usage. Mobile devices are designed to attempt to use as little power as possible as they run off batteries.
Now that we have had a look at the different types of cameras, let’s now have a look at some of the file formats they create.
File Formats
Once you take your photo, in most cases it will be saved on the camera and will need to be transferred to the computer. The most commonly used format is JPEG. This format was introduced in 1992. It has been improved since then and has undergone a number of different versions. JPEG uses lossy compression.
Lossy compression is essentially destructive compression. This means that each time you save the file the quality of the file is reduced. Essentially it is like taking a photo and photocopying it. Then taking the same photo and copying it again. The new copy won’t be as good as the last. The more you do it, the worse the quality becomes. So, it is not recommended that you keep editing the same JPEG image over and over again, as each time you save it quality can potentially be lost.
JPEG is the most widely used picture format used today. Even with the problem of reduced quality each time it is re-saved, it offers good compression. When saving the image, some software will give you the option to have a small file size thus reducing the quality, or a larger file size increasing the quality.
In this example, the left side of the image is poor quality and as we move to the right the quality increases. Essentially the compression rate from left to right is decreased. It’s not possible to save an image like this, however, it has been created to show how changing the levels of compression can affect the image.
In order to address the issues of lossy compression and also patent problems with other file formats at the time, Portable Network Graphics or PNG was created. This file format was standardized in 2004. It offered lossless compression, however, it was a little slow to take off. Nowadays, it is the second most used picture format after JPEG.
PNG also supports transparency where JPEG does not. Transparency means that pixels can be marked as transparent, that is they can’t be seen or even partially seen. A camera won’t take a photo and use transparency, however, it is a very useful feature for editing. Given that this format also supports lossless compression, for video production I convert any files that I am currently working on to PNG. This means that I don’t have to worry about the file degrading over time if I edit it and it supports features like transparency. Lossless compression will make the file a little larger than lossy compression, so if you are not planning on editing the file at all, I would just leave it in its original format.
The next format that I will look at is RAW. RAW format is essentially the output from the camera sensor outputted in an unprocessed state. Cameras will still have some processing that is performed on the image before it is saved, usually to improve the image like removing noise.
This RAW format is vendor specific so there are different versions of it. In order to download RAW images from your camera, your camera needs to support it. The more expensive cameras will tend to support it, while the cheaper cameras generally do not.
Since the files are unprocessed, the files will be larger. The reason you may want to use RAW images is that it gives you some more options in post-production. In this example, you can see the top image is the RAW image. It is kind of dark, however, using some post-production the shadow and highlight details were improved. Now you may be thinking, you could apply these effects anyway, so why the need for the RAW file? Well, the reason is that you are then limited to starting with what post-production the camera thought was appropriate. With a RAW image, you can make your own decisions on what changes you want to make. You are not limited to what the camera decided and having to work from there.
This covers the commonly used formats. Now I will have a look at some newer formats you may also come across.
High Efficiency Image File Format (HEIF)
The next format I will look at is the High Efficiency Image File Format otherwise known as HEIF. This file format was introduced in 2015, so compared with the others that we have looked at it is not that old.
The file format uses High Efficiency Video coding. If you have not heard of this before, you may have heard of HEVC or H.265. This is used in video encoding. If you have not heard of it, you may have heard of its predecessor H.264. H.264 is commonly used on sites like YouTube to compress videos. H.265 is a newer version which gives better compression.
Now you may be getting confused over how these two are related to each other. HEIF is a container format. A container format, as the name suggests, is a container for other things. In this case, a single HEIF file contains metadata, thumbnail data and image data. You will notice the image data is HEVC. So, what does this mean? This essentially means, rather than storing the data as a single image, the data can essentially be stored as a video. In other words, the file format can store one or more images.
If you have a small animation, for example a few seconds, this could be stored using this file format. You could also have a single image stored in this file format if you wanted. The advantage of using this format over other formats is that it creates smaller file sizes. Depending on what compression settings you use your results may vary; developers claim that it can achieve half the file size of JPEG. The format also supports 16-bit color where JPEG is limited to 8-bit. The disadvantage is that it requires more CPU processing.
With picture formats that don’t have much data, using more CPU for each photo is not really a problem since there is not much data to decode. However, for long videos this becomes more of a problem. You can begin to understand why H.265 has not taken off as a video format as yet, since H.264 will work on a lot of computers and gets good performance while H.265 requires a lot of processing power to get good results.
The next disadvantage is poor software support. Only a few devices on the market currently use the format, so there hasn’t been a push for good software support. You will find that a lot of editing software will not currently support the format. In many cases, when you export an image from a device like a mobile device it will convert the picture automatically to JPEG or PNG simply for compatibility reasons.
Software support in the future will most likely improve, but for the moment don’t expect too much support for the file format too quickly. File formats like JPEG have been around for the last 20 years and have become well supported in that time. HEIF is pretty new and not used by many devices. Once it starts becoming more widely used, you can expect to see more software support for it. I have now had a look at the commonly used file formats, I will next have a look at the compatibility problems that you may experience using these file formats.
Compatibility
One of the ways that you will transfer files from a device is using a USB cable. Some devices may also support WiFi or e-mail. Let’s consider that you have a mobile device that you want to connect to a computer using a USB cable. The same principles apply if you were plugging a camera into a computer.
The old protocol used for this was “Mass Storage Device”. Essentially this protocol means the computer would see the storage on the device essentially the same way it would see a USB stick. This causes some problems and had some limitations. Basically, the way this worked is, that only one device could have access to the storage at once. So, when you plugged in the device the storage could no longer be accessed by the device and could only be accessed by the computer.
This would mean that files like system files could not be stored on the same storage media because they would no longer be available to the device when it was connected to a computer using the mass storage device protocol. It also would mean that if the device was accessing a file, for example, writing a picture to storage, switching the storage to the computer would prevent the device from accessing the storage. Thus, the picture may only be half written or the device may simply prevent the computer accessing the storage.
To get around problems like this, “Media Transfer Protocol” or MTP was created. New devices should support this protocol. Older devices may not. You will know which protocol is being used as when you look at the device in your operating system it will either appear as “Mass Storage Device” or it will appear as the name of the device.
MTP prevents access to certain files. For example, it prevents the computer accessing files that are in use or system files. This gets around the problem of two devices attempting to access the same file at the same time.
An older protocol to MTP is “Picture Transfer Protocol” or PTP. This protocol was only designed for pictures. MTP will also work with video files and other files. These protocols also have additional features such as they may convert files when they are transferred. For example, if you have an HEIF picture it may convert it to a PNG when transferring it to the computer. Some devices will do this automatically due to HEIF not having good software support. This feature can also work with video files. For example, when transferring a video file from the device, it is possible for the device to convert the video file when it is being transferred from the device to the computer. This is for the same reason as before, simply to create a file that is more compatible when it is transferred to the computer.
If you are having problems, switch to an older mode. MTP has been around for a long time now, so hopefully you won’t have any problems. If you do experience some issues, it will most likely be with a very old operating system.
iPhones are now starting to use the HEIF format as the default picture format. If this is causing problems, you can always switch this off in the settings, changing the default format to JPEG. To do this, in the settings you need to select the option “Most Compatible”. By selecting this, it will make any new pictures be stored in JPEG format. This will be more compatible with existing software, however, the files will be larger.
Summary
To end this video, I will have a quick look at the major points covered in this video. Essentially your choice of camera can fit into four different categories. Mobile devices including devices like tablets often come with an integrated camera. The advantage of this is that since it is included there is no additional cost to using it.
Integrated cameras like these can give some good results, however, they don’t work as well in low light or with fast-moving objects. They also have a fixed lens, so are limited to what you can use it to achieve. For example, you won’t be able to zoom in on an object in the distance.
A basic camera will have a few more features. In some cases, it may also include optical zoom. Optical zoom allows the light traveling through the lens to be changed allowing you to zoom into far away objects. If this option is not available, your camera may include digital zoom. Digital zoom is where software is used to zoom into the image after it is captured by the sensor. This will not give you as good results as optical zoom and the more you zoom in the more pixelated your picture will look.
The next camera is a mirrorless camera. A basic camera is also essentially a mirrorless camera, however, when you see this term used, it is generally referring to a camera that costs more than a basic camera. These cameras come with additional features. In most cases, but not always, they will have a changeable lens. Being able to change the lenses is helpful depending on what you are trying to achieve. There are many lenses on the market such as long distance lenses, close-up lenses and fisheye lenses. Each lens has its own advantages and disadvantages.
The last camera is the mirrored cameras which are essentially your DSLR cameras. These cameras cost a lot more and thus have a lot more features. The biggest feature in using a mirrored camera is it allows fast focusing. If you need this feature, you are going to have to purchase one of these cameras, however, mirrorless cameras are getting faster and faster at focusing.
The next point to consider when purchasing a camera is the sensor used in the camera. A bigger sensor has a larger area and thus gives better results. Larger sensors cost more so they are generally found in the more expensive and larger cameras.
Larger sensors have less noise than smaller sensors so will also work better in low light. This is why you will see a big difference between a camera in a mobile device compared with a DSLR camera when used in low light conditions.
Nowadays, the most common used sensor is CMOS. The difference between the results from CMOS and CCD is not that great, although both have their advantages. Due to the lower power consumption and costs of CMOS sensors, this is the main reason they are the dominant sensor in the market. In lower cost cameras, the manufacturer may not release too many details about what sensor is used. As cameras get larger and more expensive you should be able to get this information. At the end of the day, you get what you pay for.
End Screen
That concludes this video from ITFreeTraining on digital cameras. I hope you have found this video useful and I hope to see you in the next video from us. Until the next video, I would like to thank you for watching.
References
“The Official CompTIA A+ Core Study Guide (Exam 220-1001)” Chapter 5 Paragraph 239 – 255
“CompTIA A+ Certification exam guide. Tenth edition” Pages 415-417
“CMOS” https://en.wikipedia.org/wiki/Image_sensor
“Rolling shutter” https://en.wikipedia.org/wiki/Rolling_shutter
“JPEG” https://en.wikipedia.org/wiki/JPEG
“Portable Network Graphics” https://en.wikipedia.org/wiki/Portable_Network_Graphics
“Picture: CCD sensor” https://upload.wikimedia.org/wikipedia/commons/6/66/Delta-Doped_Charged_Coupled_Devices_%28CCD%29_for_Ultra-Violet_and_Visible_Detection.jpg
“Picture: Image sensor” https://commons.wikimedia.org/wiki/File:Matrixw.jpg
“Picture: Rolling shutter effect” https://commons.wikimedia.org/wiki/File:Rolling_Shutter_Effect_at_Afton_Down,_21_August_2018.jpg
“Picture: Rolling shutter helicopter” https://commons.wikimedia.org/wiki/File:Jamtlands_Flyg_EC120B_Colibri.JPG
“Picture: Megapixels chart” https://commons.wikimedia.org/wiki/File:Sensoraufl%C3%B6sungen.svg
“Picture: SLR cross section” https://commons.wikimedia.org/wiki/File:SLR_cross_section.svg
“Picture: Jpeg cat” https://commons.wikimedia.org/wiki/File:Felis_silvestris_silvestris_small_gradual_decrease_of_quality.png
“Picture: Dice picture” https://en.wikipedia.org/wiki/File:PNG_transparency_demonstration_1.png
“Picture: Banana vendor” https://en.wikipedia.org/wiki/Raw_image_format#/media/File:Raw_vs_jpg.jpg
Credits
Trainer: Austin Mason http://ITFreeTraining.com
Voice Talent: Tomislav Krevzelj
Quality Assurance: Brett Batson http://www.pbb-proofreading.uk

