

What’s Coming Up
In this video, I will explore some of the common issues you might encounter, such as overheating and physical damage to computers. As a computer technician, you’ll frequently encounter service calls related to these types of problems.
Is There a Pattern
When troubleshooting difficult problems, consider asking yourself, is there a pattern? In IT, I have heard so many times the story of a server crashing at the same time outside regular business hours because the cleaner unplugged the server to use the vacuum cleaner.
I have never met a cleaner who has done this, but I keep hearing the story. So, I wonder, did it really ever happen or is it an IT myth? If you have ever met a cleaner that has done this, let me know in the comments.
Hopefully, you will find a pattern that will allow you to identify the problem. For example, some heat related problems either start occurring when the computer has been on or off for a certain amount of time or under load for a certain amount of time. Other problems may only start occurring when you use certain hardware or do certain things.
In some cases, the problems may occur randomly and are known as intermittent. These are often the hardest problems to identify, as they appear to occur randomly and there is nothing obvious causing it.
I once encountered a user whose computer would experience significant slowdowns and functionality issues every few months. We fixed it by re-imaging the computer but could not identify the cause. After thorough investigation, we discovered that the user regularly used a poorly designed third-party cleanup tool to free up storage space. The cleanup tool was making changes to the system, causing performance issues.
These problems are not always user related, they may be caused by software, disk file corruption problems, or malware.
Check Software Problems/Damage
When checking for problems, it is good to start with checking for software problems or broken software. One good place to look is the log files. On Windows, the Event Viewer is a good place to look. If the problem is a particular application, often it will have its own log files. It is worth having a look in the log files to see if anything was recorded just before the problem occurred.
Since operating systems have a lot of components, sometimes one component may cause another to crash. If you see any errors in the logs around the time the software crashed, even if it is in an unrelated system, it is worth looking into it, to see if it may be causing the problem.
It is also a good idea to check for Malware. If you have malware software installed, check to make sure that it is still running. I have had users switch off Malware software to speed up their computers. It is good to check if the software is still running.
Other Checks
Other checks you can do include checking that the power supply is working correctly. A power supply that is not working correctly will cause the computer to restart and crash unexpectedly. You can also run diagnostic tools, for example, MemTest86. This is freely available software that will test that the memory in your computer is running. Your computer may also include additional diagnostic tools which may be accessed through the computer’s setup.
Overheating
I will now look at overheating problems with computers. Modern computers control their temperature and the main way they do this is by using fans and thermal throttling control. Let’s consider a CPU as an example. A CPU will normally operate within a particular temperature range. Different CPUs will operate at different temperatures.
When you switch your computer on, it is not under load, so it should stay within its normal temperature range. If the CPU is at a higher temperature range than normal, most likely the cooling in the computer is not working. This is often caused by the CPU cooler and CPU not having a good connection, usually due to poor thermal paste application, dust or other factors slowing down the fans on the CPU.
If the components in your computer exhibit higher-than-normal temperatures or the fans are spinning faster than usual, even when it’s not under heavy usage, it likely indicates a cooling issue.
When the computer is under load, the components are doing more work and thus will get hotter. To keep the components cool, the fans will increase in speed. On a lot of computers, you can hear the fans spin up and will get louder when the computer is under load. This is normal and nothing to worry about.
Under load generally means doing something intensive on the computer, for example, converting videos or performing very intensive calculations. Doing basic tasks like reading e-mail and creating Office documents won’t put the computer under a lot of load.
If the temperature gets too high, this signals to the computer that something else needs to be done to get the temperature down. This will generally mean reducing the clock rate. Reducing speed reduces the amount of heat each component will generate. As a consequence, the performance will be reduced. If the computer does not do this, the component may overheat which can cause damage or the computer may unexpectedly reboot. Thus, unexpected reboots can be a sign there is a cooling problem with your computer.
Demonstration of CPU Temperature
To understand this process better, I will use a hardware monitor to see what is happening with the CPU and fan speed. The CPU is currently 56 degrees Celsius, and the fan speed is about 2100 revolutions per second or RPM.
I will now start some video encoding using the CPU. It will quickly increase in temperature and the fan speed will also increase. You will notice the increase in temperature happening very quickly. This CPU has a maximum operating temperature of 95 degrees Celsius and thus is still under its maximum temperature. A CPU will often have a burst speed that it will run at until it starts getting hot and then it will have to start slowing down. Thus, you can see how important cooling is, as good cooling will increase this burst time. Let’s have a closer look at what can cause cooling problems.
Bad Example
To understand the problems that can occur with cooling, I will have a look at a bad example. This computer has been put together very badly. As we have learnt, poor cooling results in the components running hotter than they should. This reduces the performance of the computer, reduces the lifespan of the components, and also makes it more subject to crashes.
The first thing to notice is the side panel is missing. Computer cases work by moving air from the front of the computer case to the back. Without the side panel, this prevents air flowing through the computer case properly.
You can also see that no cable management has been performed. Poor cable management reduces air flow through the computer and also risks the cables getting stuck in the fans.
As we can see, inside the computer case is a thin layer of dust. Dust gets in everywhere, so, when using a computer, you want to put the side cover on.
Missing Blanking Panels
This computer also has a lot of missing blanking panels, at the front and at the back of the computer case. Missing blanking panels disrupt the airflow of the computer, thereby reducing the cooling effectiveness of the computer case and increasing the amount of dust inside the computer. Thus, it is important to replace any missing blanking panels in the computer case.
IO Panel Missing
Also missing is the IO panel. This helps to keep out dust, avoids electromagnetic interference, and improves airflow. It is important to keep the cooling of the computer effective by installing IO panels and blanking panels.
Dust in Vents
Even if you have all the blanking panels and IO shield installed, you need to keep your vents clear of dust. Having dust in the vents reduces the amount of air that can flow through the computer. This reduces the ability of the computer to cool itself.
Keep Fans Clear of Dust
The next thing to ensure is that there is no dust in the fans. Dust in the fans prevents air flow and too much dust can prevent the fans from spinning. You can see in this example, this fan has so much dust that air flow is significantly blocked. Dust like this means the computer will increase the speed of the fan to compensate and reduces its ability to remove heat from the CPU. In the worst case, the dust will prevent the fan from spinning.
Fans Connected?
It is a good idea to make sure that all the fans are connected. You will notice that this computer has a case fan. When I turn the computer on, the case fan won’t start up because it has not been plugged in.
Although it may seem like a simple thing to check for, when you have a computer with a lot of case fans, it is easy to miss one or for one to become blocked. So, check them all to make sure they are working correctly.
Heat Sink Secured?
You should check that the heatsink on the CPU has been attached correctly. Don’t be afraid to grab hold of the CPU cooler and give it a light pull. In the case of this CPU, you will notice that it is not secure, thus the CPU cooler will come loose. A poorly fitting CPU cooler will reduce the ability of the cooler to remove heat from the CPU. Thus, the CPU will run hotter than it should.
Loose Heat Sink
To see the effects of having so much dust in a computer, I will now remove the heatsink. You can see that dust has found its way past the retention plate and even onto the CPU. It just goes to show, if you don’t limit dust getting into the computer, it will get into everything.
The thermal paste has hardened, which is normal over time. It usually takes a couple of years for a correctly fitted CPU cooler. For a badly fitting CPU cooler, the process is faster as more air can get to the thermal paste.
Environmental Factors
The last thing to consider is environmental factors. These factors can cause performance and reliability problems. Let’s consider that you have a computer. It is important to consider where you put the computer. For example, you don’t want to place it next to a radiator.
If the computer is placed next to a heating device, its fans will be pulling in hot air. Although you can move it away from the radiator, if the room is always hot, this can affect the computer. For example, if the computer is located in a kitchen. Sometimes these things can’t be avoided. In these cases, make sure you don’t put the computer near something that generates a lot of heat. If heat is still affecting the computer, you may need to install a better cooling system or put the computer in an air-conditioned cabinet.
Next, it is best not to place the computer in direct sunlight. Direct sunlight will heat the computer up and can cause the plastic to degrade affecting its reliability.
It is also important to consider other environmental factors. For example, environments where a lot of dust may be created. I once worked in a factory that had a foundry in it. Some of the machinery required computers to operate them, which put them close to the foundry. These computers would get clogged up with black dust and an air compressor had to be used regularly to remove the dust.
To fix the problem, we installed cabinets with air filters to stop dust getting into the computer. These worked quite well. Something to consider if the computer has to be placed in an area where there is a lot of dust.
Lastly, if there are devices that create a lot of electromagnetic interference, like large motors, these can cause problems with computers. If you have no choice but to put a computer near a source of electromagnetic radiation, you may need to put the computer behind some shielding to protect it.
If possible, keep the computer in an area with low dust, low humidity, away from electromagnetic interference and out of extreme temperatures, both hot and cold. Most of the time that is pretty easy by just being careful about where you put the computer. In other cases, you may need to purchase special cabinets to put the computer in to protect it. Now let’s look at physical damage.
Physical Damage
The biggest risk to damaging computers is generally when moving them. If you do need to move them, handle with care and pack them well. If you are able to, use the original packaging, as this works well.
When transporting, make sure you protect items against static electricity. Items that are in the packaging or in a protective case should be fine, except under extreme conditions, while loose items should be put in an anti-static bag.
Anti-static protection helps prevent static electricity getting to electronic items. They won’t stop high levels of static electricity, as some will still get through. Also, keep in mind that static electricity needs somewhere to go. The bag will generally absorb it and it eventually dissipates into the air. If the anti-static bag gets subjected to too much charge, it loses its effectiveness. Nothing too much to worry about, just put the electronics in the anti-static bag and handle it with care and you will be fine.
Dirty Connectors
Next, I’ll examine the issue of dirty connectors. Generally, the motherboard and other internal components are well-protected and securely installed, minimizing the risk of damage under normal conditions. However, connectors, which are external elements of the computer, are more exposed and vulnerable to environmental factors such as dust, mechanical damage and other external influences.
You can see in this computer, there is a lot of dust on the USB port. Dust like this affects the ability for the connector to make a good connection. This can reduce the reliability of the connector and also its top speed. As more cables get put in the connector, dust and other materials get pushed in as well.
To start with, I will use a can of compressed air to blow out the dust from the connector. Hopefully this will be enough to clean it. Before I look at other ways to clean the connector, I will first unplug the power from the computer. With modern computers, even when switched off, some connectors may still have power running through them. For example, some USB ports can charge devices while the computer is off or detect a key press on a keyboard or a mouse click to start the computer up. Before cleaning the port, I first check to make sure there is no power in the connector.
If compressed air doesn’t completely remove dirt and dust from the connector, you can carefully use tweezers for further cleaning. In this instance, I’ve used metal tweezers, which carry the risk of a short-circuit if they accidentally contact two pins simultaneously. To mitigate this risk, I turned off the power before starting, effectively eliminating the chance of electrical damage. It’s crucial to proceed with caution during this process to avoid damaging any internal pins of the connector.
A cotton tip can be a useful tool for cleaning connectors. While it’s important not to insert it too deeply to avoid damaging the pins, a cotton swab is effective for cleaning the outer area, especially if it’s dirty or has signs of rust. For safe and thorough cleaning, use an alcohol-based cleaner designed for electronics, thus ensuring you don’t harm the connector.
You can see the connector looks a lot cleaner than it did before. There is still some material on the right side that did not come out. But now that we have cleared some of the material out, notice that the far-right pin is bent, which brings us to our next topic.
Damaged Connectors
Sometimes you will come across damaged connectors. In some cases, you can potentially fix the damage, other times, for example, with blade connectors, you may not be able to. In this example, one of the pins is bent, so I am going to attempt to bend it back into place.
Attempting this repair can be challenging and carries the risk of breaking a pin. It’s wise to consider alternatives when possible. For instance, in this scenario, the USB port is directly connected to the motherboard. An alternative solution is to use a USB expansion adapter. This involves disconnecting the existing USB connector from the motherboard and replacing it with the adapter. Consequently, the front ports would become unusable, but the adapter’s ports would serve as a substitute. In certain situations, such as with laptops, repairing the connector may be the only option, so let’s explore how to approach that.
To start with, I will attempt to lever the pin out. You will notice the pin is bent over itself making this harder. This will be a tricky one to fix!
Whenever you attempt this kind of repair, there’s a risk of breaking the pins. If you’re working on a customer’s computer, it’s crucial to inform them about this risk beforehand. Make sure they understand and consent to you proceeding, acknowledging the potential risks involved.
You will observe that the bent pin has trapped a significant amount of dirt and other debris. Before proceeding further, I’ll carefully clean this out. You can see that a single bent pin can accumulate a lot of material.
I will now try realigning the bent pin. Honestly, it was quite a task – it took us about ten minutes to get it back into shape. The difficulty arose because the pin was folded over itself, complicating the realignment process. Aim to position the pin as accurately as possible, though achieving perfect alignment may not be feasible. Getting it close enough is often sufficient. Remember, repeatedly bending pins increases the risk of breaking them, so proceed with caution.
I will now plug in a USB cable. I will do this gently and with a slight wiggle to accommodate the misaligned pins. It’s important to avoid forcing the cable in, as this could further bend or misplace an already misaligned pin. If the cable doesn’t fit smoothly, carefully remove it, adjust the pins slightly and attempt the connection again.
When I do a repair like this, I will generally use a USB extension cable, leaving the user strict instructions to only plug USB devices into the end of the extension cable and that the USB cable is to remain connected to the computer. Unplugging it risks damaging the port further. Remember, the pins are not in perfect alignment and each time a device is plugged in, there is the risk of further damage to the port.
Spills
In some cases, you may have a computer that has been subjected to a spill. Look for any signs of this. If the keyboard or computer is wet or sticky, this tends to indicate there has been a spill. Even if it was a while ago, spills involving drinks often leave a sticky residue after they dry.
If you are there when the spill occurs, clean it up quickly and switch off the computer. If it helps, turn the computer upside down so the spill can drain away. If required, take the computer apart and find any components with liquid on them. Once you locate the spill, use a towel or something similar to clean up the liquid. In very bad cases, use isopropyl alcohol cleaner. Alcohol cleaner will evaporate leaving no residue.
Hopefully, you won’t have to deal with any spills. If you do save the computer, sometimes its lifespan will be reduced. Best to avoid spills if you can.
Damaged Components
If you have damaged components, there may be something visible to show this is the case. In some cases, you may have scorch marks around damaged components or a little bit of black soot. This may be difficult to see.
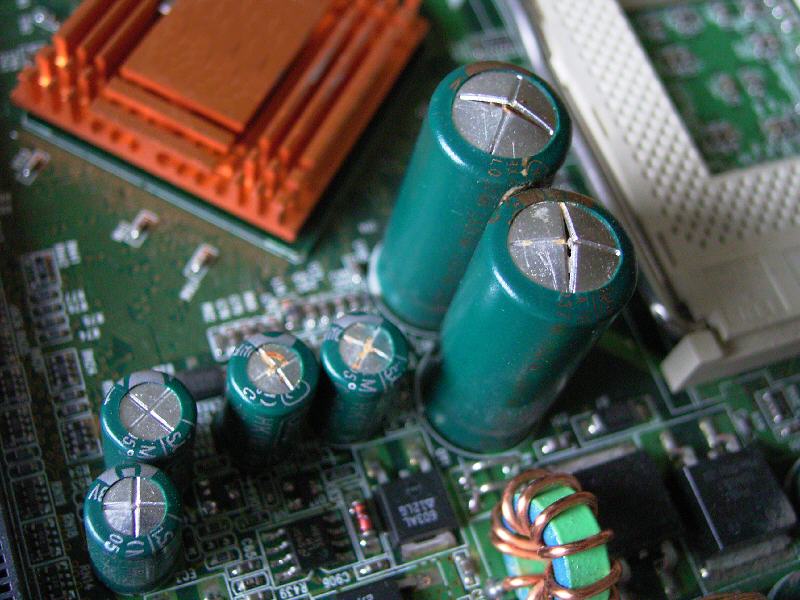
When capacitors fail, they may become swollen or start leaking. In the early 2000s this was a big problem, but nowadays you don’t tend to see it so much. If your device is randomly restarting or switching itself off, it may be due to a problem with a capacitor.
Swap With Known Good Part
When troubleshooting, it helps to swap components with known good parts. This helps you determine what is working and what is not. Essentially, you are using the process of elimination to find the failed component.
Sometimes you won’t be able to replace a component with a good part. When this occurs, test each component whenever possible. The manufacturer of the computer or the component may provide tools for testing. Using these will help you find the component that has failed.
End Screen
That concludes this video on troubleshooting components. I hope you have found this video useful. Until the next video from us, I would like to thank you for watching.
References
“The Official CompTIA A+ Core Study Guide (Exam 220-1101)” pages 110 to 112
“Picture: CPU fan” https://www.pexels.com/photo/computer-exhaust-fan-2643596/
“Picture: computer in packing foam” https://www.pcinq.com/montech-air-900-argb/
“Picture: Old broken computer” https://unsplash.com/photos/ZO0weaaDrBs
“Picture: Swollen capacitors” https://upload.wikimedia.org/wikipedia/commons/7/76/Defekte_Kondensatoren.jpg
“License CC BY 4.0” https://creativecommons.org/licenses/by/4.0/
Credits
Trainer: Austin Mason http://ITFreeTraining.com
Voice Talent: HP Lewis http://hplewis.com
Quality Assurance: Brett Batson http://www.pbb-proofreading.uk